こんにちは。今回は過去に勉強会で発表したSlateについて紹介します。
Slateとは
jigish/slate – Github
Slateとは、OS X上で動作し、ウィンドウのフォーカス移動・リサイズ・移動などをキーボードから楽に行えるようにするアプリケーションです。ウィンドウ操作を高速に、マウスから手を離さずに行えるようになります。
実際にSlateでウィンドウのリサイズ/移動を行っているところのgifアニメです。このような操作の他、
- ウィンドウの配置の記録/復元
- 特定のアプリケーションや、指定した方向にフォーカスを移す
- スクリーン間でウィンドウを飛ばす
- ウィンドウにヒントを表示してフォーカス移動する
などの操作をキーボードから行うことができます。
Slateの設定
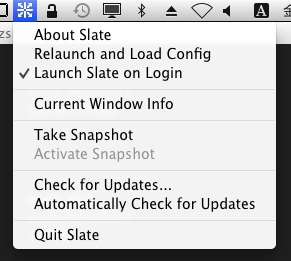
Slate自体はステータスバーに常駐する簡素なアプリケーションで、細かな設定を行うGUIなどは用意されていません。Slateの設定は独自の書式の.slateかJavaScriptで.slate.jsに記述します。ある程度の操作は.slateで記述できますが、より複雑な操作を行いたくなったら.slate.jsを書くと良いでしょう。
詳細な設定方法はgithub上によくまとめられています。
README.mdには使用できるoperationなどが, WikiのJavaScript-ConfigsにはJavaScriptから扱える各種APIが記述されています。
例えばvim-likeにalt + hjklでフォーカス移動がしたい場合は次のように記述できます。
// .slate
bind l:alt focus right
bind h:alt focus left
bind k:alt focus up
bind j:alt focus down
少々面倒ですが、慣れると快適なので自分好みに設定していくことをおすすめします。
参考に私の設定ファイルの一部を貼っておきます。私は.slate.jsに全て書いていますが、.slateと.slate.jsは併用することができます。
// .slate.js
var util = {
  // alt + ..
  key: function(k, mod) {
    return k + ':alt' + (mod ? ',' + mod : '');
  },
  focusWindow: function(f) {
    var hit = false;
    slate.eachApp(function(app) {
      if (hit) return;
      app.eachWindow(function(win) {
        if (hit) return;
        if (f(win)) {
          win.focus();
          hit = true;
        }
      });
    });
  },
  nextScreen: function(screen) {
    return slate.screenForRef(String( (screen.id()+1)%slate.screenCount() ));
  }
};
// return     .. iTermを起動
slate.bind(util.key('return'), function(win) {
  slate.shell('/usr/bin/open -n -a iTerm');
});
// r+ctrl     .. Slateの再起動
slate.bind(util.key('r', 'ctrl'), function(win) {
  slate.operation('relaunch').run();
});
// hjkl       .. その方向へフォーカス移動
slate.bind(util.key('h'), slate.operation('focus', { direction: 'left' }));
slate.bind(util.key('j'), slate.operation('focus', { direction: 'down' }));
slate.bind(util.key('k'), slate.operation('focus', { direction: 'up' }));
slate.bind(util.key('l'), slate.operation('focus', { direction: 'right' }));
// i          .. 下に隠れているウィンドウをフォーカス
slate.bind(util.key('i'), slate.operation('focus', { direction: 'behind' }));
// o          .. スクリーン間でフォーカスを移動
slate.bind(util.key('o'), function(win) {
  var next = util.nextScreen(slate.screen());
  util.focusWindow(function(win) {
    return win.screen().id() == next.id();
  });
});
// o+shift    .. 次のスクリーンへ飛ばす
slate.bind(util.key('o', 'shift'), function(win) {
  if (!win) return;
  var next = util.nextScreen(win.screen());
  win.move(next.visibleRect());
});
// j+shift    .. 4隅に飛ばす
var corners = slate.bind(util.key('j', 'shift'), slate.operation('chain', {
  operations: _.map(['top-right', 'bottom-right', 'bottom-left', 'top-left'], function(d) {
    return slate.operation('corner', {
      direction: d,
      width: 'screenSizeX/2',
      height: 'screenSizeY/2'
    });
  })
}));
// k+shift    .. 左右に飛ばす
slate.bind(util.key('k', 'shift'), slate.operation('chain', {
  operations: _.map(['left', 'right'], function(d) {
    return slate.operation('push', {
      direction: d,
      style: 'bar-resize:screenSizeX/2'
    });
  })
}));
// h+shift   .. ウィンドウが左にあるなら縮小, 右にあるなら拡大
slate.bind(util.key('h', 'shift'), function(win) {
  if (!win) return;
  var rect = win.rect();
  var bounds = win.screen().visibleRect();
  if (bounds.x + bounds.width - 30 < rect.x + rect.width) {
    rect.x -= bounds.width * 0.05;
    rect.width = bounds.x + bounds.width - rect.x;
  } else {
    rect.width -= bounds.width * 0.05;
  }
  win.doOperation('move', rect);
});
// l+shift   .. ウィンドウが右にあるなら縮小, 左にあるなら拡大
slate.bind(util.key('l', 'shift'), function(win) {
  if (!win) return;
  var rect = win.rect();
  var bounds = win.screen().visibleRect();
  if (rect.x < bounds.x + 30) {
    rect.x = bounds.x;
    rect.width += bounds.width * 0.05;
  } else {
    rect.x += bounds.width * 0.05;
    rect.width -= bounds.width * 0.05;
  }
  win.doOperation('move', rect);
});
// m          .. 最大化
slate.bind(util.key('m'), function(win) {
  if (!win) return;
  var bounds = win.screen().visibleRect();
  win.doOperation('move', bounds);
});
最後に
勉強会で使用したスライドに手を加えたものを貼っておきます。
この記事内ではSlateの基礎に視野を絞りましたが、スライド内では併用したいアプリケーションやSlateそのものの拡張についても言及しています。
スライドを開く